Nuthead AI
Help & Tutorials
Installation
Welcome to Nuthead AI! This guide will help you install and get started with our powerful video editing tool.
-
Download and Move to Applications Folder:
-
Drag and drop the Nuthead AI application into your Applications folder.
-
-
Opening Nuthead AI:
-
When you first open Nuthead AI, macOS might prevent it from launching because it cannot verify the software for malicious content.
-
To bypass this, hold the Control key, click on the Nuthead AI application, and select "Open" from the context menu. A dialog box will appear; click "Open" again to confirm.
-
You only need to do this the first time you open the application. After that, macOS will remember your preference.
-
For more detailed instructions on how to open, you can refer to Apple's official support page here. We are actively working to eliminate these steps in the near future and bring Nuthead AI to the App Store for a smoother installation experience.

Importing Footage
-
Main Timeline:
-
Drag and drop your main footage into the “Main Timeline” section. This can be MP4, AVI, MOV clips with audio, or pure MP3 or WAV audio files. This footage will serve as the primary basis for our AI processing.
-
Clips here cannot overlap and must occur sequentially. You can adjust the offset (time shift) for each clip by setting it in the lower-left corner of the added clip. If the offset is not sufficient, Nuthead AI will display a warning at the start and automatically correct it to ensure the clips occur sequentially.
-
-
Supplementary Footage:
-
Drag and drop supplementary footage into the “Supplementary Footage” section. This can include different camera angles, screen recordings, or close-up shots that run parallel to the main recording.
-
These supplementary clips are not content-analyzed but are cut in sync with the main timeline footage. Here, the offset is particularly important. While the videos are prepared to allow manual synchronization later, we offer a Smart Offset function, enabled by default. This function searches for the offset within a range of ±10 seconds, making precise synchronization easier if all cameras started around the same time.
-
Hint: After importing the footage, individual videos can be moved between the Main Timeline and Supplementary Footage sections. Use the arrow in the lower-right corner of the imported video for this. If you want to preview the video, you can open it directly from here or remove the entry entirely.
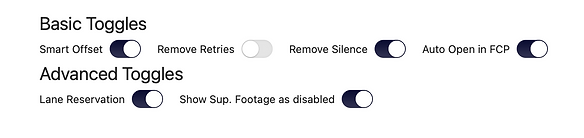
Toggles
-
Smart Offset:
-
This feature automatically synchronizes recordings based on a rough user estimate. Our proprietary algorithm aligns the start of various camera perspectives, even in challenging audio situations and lengthy videos.
-
The input field under Smart Offset accepts seconds and the HH:MM:SS format. If Smart Offset is disabled, timecodes can be entered as seconds, HH:MM:SS:FF (where F stands for Frames) or as HH:MM:SS:mmm (with mmm for milliseconds, which must be three digits). This ensures compatibility with standard Final Cut displays and provides flexibility in offset entry.
-
Note: Smart Offset works reliably for clips that overlap for at least 60 seconds.
-
-
Remove Retries:
-
Enable this to use transcripts and context-sensitive intelligence to identify and remove up to 95% of duplications and failed attempts in various takes.
-
You can also disable Remove Retries to shorten videos based on volume levels or simply to synchronize two clips for manual editing.
-
-
Remove Silence:
-
This option removes silent segments from your recordings, streamlining the editing process. Disable this if your project requires silent segments, such as software demonstrations.
-
If a recording is delivered without pauses, making it a continuous speech, it is better to disable Remove Silence for optimal results.
-
-
Auto Open in FCP:
-
When enabled, Nuthead AI will automatically open the final project in Final Cut Pro upon completion.
-
-
Lane Reservation:
-
This feature reserves entire lanes in Final Cut Pro for each camera perspective, even if they are not continuously visible, ensuring better project organization.
-
If two clips represent the same camera perspective at different times, it is advisable to disable Lane Reservation.
-
-
Show Sup. Footage as Disabled:
-
This option allows you to mark supplementary footage as disabled within Final Cut Pro, making it easier to manage your timeline.
-
-
Testimonial (Beta):
-
This overrides additional toggles as well as the specified timecodes. Testimonials from two perspectives are synchronized here, and pauses are removed. Ensure that the clips are displayed in the correct order and in the same number in both rows. Each clip from the first row is synchronized with the corresponding clip from the second row.
-

Project Settings
-
Resolution:
-
Set the resolution for your project. The default is set to "auto," but you can select specific resolutions based on your needs. This is necessary if different camera settings are used in various clips.
-
-
Frames per Second:
-
Choose the frame rate for your project. The default is "auto," but you can specify the frame rate if needed. If filmed at more than 30 frames per second, it is advisable to set the frame rate to between 23 and 30 for optimal moderation playback.
-
-
Color Space:
-
Select the color space for your project. The default is "auto," but you can customize this setting to match your media. This is crucial for HDR mastering. Adjusting the color space later is challenging, so ensure your project is set correctly for your HDR workflow from the start.
-
Processing and Finalization
-
Once you have configured your settings and imported your footage, click on the “use nuthead-ai” button. The AI will process your footage based on your settings. Typically, 75% of projects require no additional settings, as Smart Offset handles automatic synchronization and settings are adopted from the source files.
-
After processing, you can open the project in Final Cut Pro (if Auto Open in FCP is enabled) and make any final adjustments.

By following these steps, Nuthead AI will help you streamline your video editing workflow, allowing you to focus more on creative aspects and less on repetitive tasks. We are excited to see how you will use Nuthead AI to enhance your projects!
If you have any questions or need further assistance, please do not hesitate to contact our support team.